Thursday, 23 August 2018

Powerful white vegetable salad with green apple


Powerful white vegetable salad with green apple


Salad contains mostly raw vegetables. We always go for coloured vegetables that are rich in minerals and vitamins. There are some white vegetables like cabbage, turnip that go well with coloured vegetables. 
                                     
Today I want to concentrate only on white vegetables that are healthy and nutritious and make a salad.
white vegetables and green apple
                                         white vegetables and green apple


                               Recipe summary
                                        For
        Powerful white vegetable salad with green apple.


white vegetables and green apple
Preparation time: 30 minutes
Cooking time: 0
Serves: 4


Preparation
Wash and peel the skin of 150 grams radish and Shred, sprinkle salt, toss and leave it in a bowl for 15 minutes as it has a pungent taste.  Squeeze   using your hand. Pat dry to remove excess water and keep aside. 
Shredded vegetables and green apple
Shredded vegetables

Wash 150 grams  cabbage leaves  put in salted water, pat dry and shred. 

Wash and peel the skins of 150 grams turnip (jicama),  150 grams cucumber and shred separately.

Wash and  peel the skin of 140  grams apple, slice and put in salted water for 5 minutes as it will get oxidized. shred it.

Peel the skin of 150 grams onion. Wash and shred.


Powerful white vegetable salad with green apple

Method 
Mix all  shredded vegetables and add 2 table spoon apple cider vinegar, 2 table spoon extra virgin olive oil, ½ tsp salt, ½ tsp pepper and toss. Sprinkle white 1 tsp of sesame seeds.

This is a crunchy salad which you can eat on its own or with rice or bread.
                                                                                        

Powerful white vegetable salad with green apple is ready.
Recipe follows in detail with pictures.
                     

Preparation time: 30 minutes
Cooking time: 0
Serves: 4

Ingredients
Main
150 grams Radish 
150 grams Cabbage 
150 grams Turnip (jicama)
150 grams cucumber
150 grams white onion
1 green apple 140 grams

Others
½ tsp Pepper powder
½ tsp Salt
2 table spoon extra virgin olive oil
2 table spoon apple cider vinegar
1 tsp sesame seeds

Preparation
Wash, peel the skin of radish and Shred, sprinkle salt, toss and leave it in a bowl for 15 minutes as it has a pungent taste.  Squeeze using your hand. Pat dry to remove excess water and keep aside. 

Wash cabbage leaves and put in salted water, pat dry and shred. 

Wash and peel the skins of turnip and cucumber and shred separately.

Wash and peel the skin of apple, slice and put in salted water for 5 minutes as it will get oxidized. shred it.

Peel the skin of onion. Wash and shred.
Shredded vegetables and green apple
Method 
Mix all the vegetables and add vinegar, olive oil, salt and pepper. Sprinkle white sesame seeds.
This is a crunchy salad which you can eat on its own or with rice or bread.

Powerful white vegetable salad with green apple

YOU MAY LIKE TO SEE MY COLORFULSALAD
Red ( Purple) Cabbage salad with baby kailan and sweet corn
Red ( Purple) Cabbage salad with 
baby kailan and sweet corn

https://simplycookingandhealth.blogspot.com/2015/04/red-purple-cabbage-salad-with-baby.html


Sunday, 19 August 2018

Garlic dried in the oven and air fryer and powdered at home.


Garlic dried  in the oven and air fryer and powdered at home
Garlic dried  in the oven and air fryer and powdered at home
Garlic is a member of the Allium family with onions and leeks. It has been used in the kitchen from ancient times as ingredient for curries soups stews stir fries and dips.
 It is anti -bacterial and anti-fungal. It has medicinal properties with vitamin B 1 and 6, manganese, iron, calcium, potassium, prosperous and selenium.
Garlic
Garlic
Today I want to dry garlic in the oven and air fryer to make garlic powder  which is aromatic.


                               Recipe summary  
                                        For
      Garlic dried  in the oven and air fryer and powdered 
                                   at home.

Garlic
Garlic


Oven made garlic powder

Preparation time: 15 minutes.
Cooking time: 5 hours.
Oven temperature: 100 degrees Celsius.

Ingredients:
500 grams Garlic cloves

Preparation
Peel and wash the garlic and wipe it dry using a cloth or kitchen paper. 
I used the peeled garlic from the supper market to save time. 

Shred the garlic. I used the food processor to shred. It took 5 minutes.
 Method1. Spread the shredded garlic on a stainless-steel tray without foil or baking sheet as it easy to scrape the garlic with a spatula as  shredded garlic is sticky. 

2. Preheat the oven for 10 minutes and keep the tray in the centre. Keep watching and stir now and then. 

3. In 5 hours time it should  be done.
 you will get the smell of roasted garlic.

Oven made garlic powder


4. Remove the tray from the oven and let it cool. Dried garlic will now be in the form of granules. 

5. Grind the granules into powder.  I got 160 grams of powder.  

6. When cooled store in a glass bottle and refrigerate. 

 Garlic powder can be used in curries, stews, cutlets, and soups.

Air fryer dried garlic cloves and powder.
Garlic powder made in the air fryer

Preparation time: 15 minutes.
Cooking time: 3 hours and 20 minutes.
Oven temperature: 100 degrees Celsius.

Ingredients:
main
70 grams garlic cloves
Garlic cloves are dried

Preparation
Peel and wash the garlic cloves and wipe them dry using a cloth or kitchen paper. 
Slice the cloves into half and then cut into small pieces.
Method
1. Place the cut pieces of garlic in a small pan. 
2. Preheat air fryer at 100 degrees Celsius for 5 minutes.
3. Place the pan into the air fryer. Set the time for 20 minutes.
4. At the beginning stir every 10 minutes so it that does not stick to the pan.
5. Repeat the process 9 times giving 20 minutes every time. In my case it took 3 hours and 20 minutes to complete the process.


Let the air fryer cool for five to ten minutes in between.

6. Finally the colour of the pieces will change into light brown and it will be firm and done.

7. Powder in grinder when it is cooled. I got 25 grams of garlic powder.

8. When cooled store in a glass bottle and refrigerate.  


Garlic dried  in the oven and air fryer and powdered at home

 Garlic dried  in the oven and air fryer and powdered 

                                at home is ready.
                                                                           
Recipe follows in detail with pictures.


Oven made garlic powder

Preparation time: 15 minutes.
Cooking time: 5 hours.
Oven temperature: 100 degrees Celsius.

Ingredients
500 grams Garlic cloves
Garlic cloves
Garlic cloves
Preparation
Peel the skin and wash the garlic and wipe it dry using a cloth or kitchen paper. 
I used the peeled garlic from the supper market to save time. 
Shred the garlic. I used the food processor to shred. It took 5 minutes.

Spread the minced garlic on a stainless-steel tray without foil or baking sheet as it easy to scrape the garlic with a spatula.  Minced garlic is sticky and it will be difficult to remove from the aluminium foil or baking sheet. 
Shredded garlic
Shredded garlic
Preheat the oven for 10 minutes and keep the tray in the centre. Keep watching and stir now and then. When it is done you will get the smell of roasted garlic.

Remove the tray from the oven and let it cool. Dried garlic will now be in the form of granules. Some like to use the granules. 
Dried garlic cloves
Dried garlic cloves
Grind the granules into powder.  I got 160 grams of powder.  
Oven made garlic powder
When cooled store in a glass bottle. I keep in the garlic powder in the refrigerator as we use only a little at a time.
Oven made garlic powder
 Garlic powder can be used in curries, stews, cutlets, and soups.


 Air fryer made garlic powder.

Preparation time: 15 minutes.
Cooking time: 3 hours and 20 minutes.
Oven temperature: 100 degrees Celsius.

Ingredients:
main
70 grams garlic cloves

Preparation
Peel and wash the garlic cloves and wipe them dry using a cloth or kitchen paper. 
Slice the cloves into half and then cut into small pieces.
Sliced garlic cloves
Method
Place the cut pieces of garlic in a small pan. 

Preheat air fryer at 100 degrees Celsius for 5 minutes.

Place the pan into the air fryer. Set the time for 20 minutes.

At the beginning stir every 10 minutes, so it that does not stick to the pan.

Repeat the process 9 times giving 20 minutes every time. In my case it took 3 hours and 20 minutes to complete the process. Time may vary according to the air fryer.

Let the air fryer cool for five to ten minutes in between.

Finally the colour of the pieces will change into light brown and it will be firm and done.

Garlic cloves are dried

 Let the dried cloves cool.  Once it is cooled  use a grinder and make the powder. I got 25 grams of garlic powder.

Garlic powder made in the air fryer
 After the powder is cooled store it in a glass bottle and keep in the refrigerator.


Garlic powder can be used in curries, stews, cutlets, and soups.
Garlic dried in air fryer and powdered


Garlic powder can be used in curries, stews, cutlets, and soups.

we use in small quantity as it is concentrated.


Friday, 10 August 2018

Easy raw bitter melon and unripe green mango salad

Bitter melon is an ugly looking  vegetable with warty skin and bitter taste.  People turn their heads away from it due to its bitter taste. but it is nutritious. It gives phytonutrients like dietary fibber, minerals, vitamins, folates, flavonoids and anti-oxidants. It helps in digestion and bowel movement.It has many medicinal properties. Most well known use worldwide is in diabetic condition. 

We all know the sweet taste of mango. It is healthy too. It is known to assist in prevention of cancer and reduction of cholesterol, in particular LDL – the bad cholesterol. Some hate it when it is unripe  as it is sour. It will strengthen the immune system and lower glucose level in diabetics. It is also thought to help digestion.

So here I am with a delicious and mouthwatering salad using raw bitter melon and unripe mango.
Easy raw bitter melon and  unripe green mango salad
                        Easy raw bitter melon and  unripe green mango salad


                                   Recipe summary
                                             For
     Easy raw bitter melon and unripe green  mango salad

Mango and bitter melon
Mango and 
bitter melon


Preparation time: 15 minutes
Cooking time: 0
Serves 3
     Preparation
1.Wash and peel the skin of 150 grams mango. Cut large pieces of the flesh and remove the seed.
Grate the flesh using a grater.

2. Wash 100 grams bitter melon cut into half lengthwise and scoop the seeds out.
Ingredients for Easy raw bitter melon and raw mango salad
Ingredients 
Grate the flesh  using a grater.

3.Slice 50 grams  cherry tomatoes into 4 pieces
4. Chop 1 onion finely.
5. Cut 1 green chili into tiny pieces.             
Method
mix all together and add salt and grated coconut.

Mango is sour it helps to remove the bitterness 
of the bitter gourd.                                                                                                                                                        The salad
 Easy raw bitter melon and raw mango salad


If you like you can add a little lime juice to make it more sour.

If you don't like to add coconut you can add grated carrot.


  Easy raw bitter melon and unripe green  mango salad is ready.

                                  RECIPE FOLLOWS IN DETAIL WITH PICTURES.
                     
Preparation time: 15 minutes
Cooking time: 0
Serves 3
Mango and bitter melon

Ingredients
 Main
150 grams raw  mango
100 grams bitter melon
50 grams cherry tomato
Others
1 onion
1 green chili
50 grams grated coconut
1/2 teaspoon salt.
1/2 lime(optional)
Preparation
Wash and peel the skin of mango. Cut large pieces of the flesh and remove the seed.
Grate the flesh using a grater.
Wash bitter melon cut into half lengthwise and scoop the seeds out.
Grate the flesh  using a grater.
Slice the cherry tomatoes into 4 pieces
Chop the onion finely.
Cut the green chili into tiny pieces.


Ingredients for Easy raw bitter melon and raw mango salad
Ingredients for Easy raw bitter melon and unripe green  mango salad 
Method
mix all together and add salt and grated coconut.
Mango is sour it helps to remove the bitterness of the bitter gourd. If you like you can add a little lime juice to make it more sour.
If you don't like to add coconut you can add grated carrot.

Easy raw bitter melon and  unripe green mango salad
Easy raw bitter melon and  unripe green mango salad

YOU MAY LIKE TO SEE


Easy Raw bitter melon salad


https://simplycookingandhealth.blogspot.com/2014/05/fried-bitter-melon-salad-balsam-pear.html


Fried bitter melon salad - Balsam-pear

Tuesday, 7 August 2018

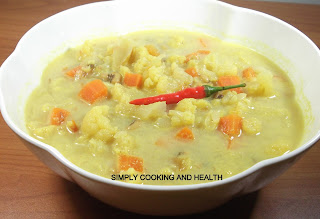
Cauliflower stew with mung bean and coconut milk


         Cauliflower stew with mung bean and coconut milk

Today I want to make a stew with cauliflower and mung bean which  is a marvelous dish as cauliflower and mung bean blend well. A must try stew.

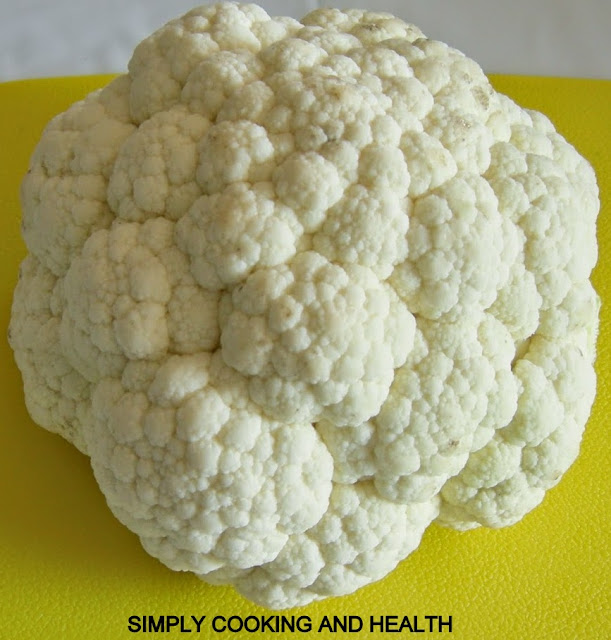
Cauliflower is a lovely white vegetable. A good  source of anti oxidant. It has vitamin C and k. It provides beta-carotene. It boosts heart health and brain health. Easy to digest. We bake, make curry,stir fry. It is a must in your diet.It helps to fight cancer and inflammation and it supports detoxification.
Cauliflower
Cauliflower stew with mung bean and coconut milk


                                Recipe summary
                                          For
       Cauliflower stew with mung bean and coconut milk

Preparation time: 20 minutes
Cooking time: 40 minutes
Cauliflower
Cauliflower 
Serves4

Preparation

Roast 1/2 cup split mung bean in microwave for 3 minutes or till it is roasted.
Add 11/2 cup of water and boil in slow fire for 15 minutes and keep aside.

Cut the cauliflower into small florets and put in salted water to 
make it insect free.

cut the  mini capsicum  lengthwise.(optional)

 Method
1. Add 2 table spoon oil in a wok and heat.
2. Fry 1 chopped onion till it turns light brown, may be around 10 minutes.
3. Add 20 grams shallots and fry for 3 minutes.
4. Add 3 cloves of chopped garlic and 10 grams chopped ginger  and fry for 1 minute.                                                                       
5. Add 1 chopped green chili and 5 curry leaves cut fine and fry for 2 minutes.
6. Add cauliflower and stir fry for 2 minutes.
7. Add 1 teaspoon cumin seeds, 1/2 teaspoon fennel seeds and
 1/2 teaspoon turmeric powder and stir.
8. Add 1 teaspoon salt and 2 cups of water. Bring to boil and lower the heat  and simmer for 8 minutes.
9. Add the capsicum . Cook till cauliflower is soft.
10. Now stir in the boiled mung bean and cook for  5 minutes.
11. Add in 1/4 cup of coconut milk, 1/2 teaspoon of pepper and cook for 3 minutes. 
12 The stew is ready.
13. If you like you can cool and liquidize it as a soup. Instead of coconut milk when you liquidize you can add carnation milk.

Cauliflower stew with mung bean
and coconut milk
14. You can also leave the spices and make the soup It is delicious too.
15. It is a marvelous stew as the cauliflower and mung bean blend well. 


Cauliflower stew with mung bean and coconut milk is ready.


                          RECIPE FOLLOWS IN DETAIL WITH PICTURES.


Preparation time: 20 minutes
Cooking time: 40 minutes
Serves: 4

Ingredients
Main

300 gr cauliflower
Onion, ginger,curry leaves,shallots
garlic,green chili
½ cup mung bean
Others
1 onion
20 grams Shallots
3 cloves Garlic 60 grams
10 grams ginger
1 green chili
1 sprig curry leaf
1 mini bell pepper 80 grams(optional)
2 cups water
1 tea spoon salt( to your taste)
SpicesI
1 tsp cumin seeds
½ tsp fennel seeds
½ tsp turmeric powder
¾ teaspoon pepper powder.


PREPARATION 
Roast mung bean in micro wave for 3 minutes or till it is roasted
Roasted mung bean
Roasted mung bean
Boil for 15 minutes and keep aside.
Cut cauliflower into florets and dip in salted water to make it insect free.


Cauliflower florets
Cauliflower florets
Cut mini capsicum length wise
Mini capsicum
Mini capsicum

Method

Add oil to a heated pan and fry onion till it turns light brown may be around 10 minutes.
Frying onion
Frying onion


 Add shallots and fry for 3 minutes and add garlic and ginger for 1 minutes. 
Adding shallots ,garlic and  ginger
Adding shallots ,garlic and  ginger

Add green chili, curry leaves and fry for 2 minutes. 
Adding green chili and curry leaves

Add cauliflower and stir for 2 minutes.
Adding cauliflower
Adding cauliflower

 Now add cumin seeds, fennel seeds and turmeric powder and stir. 
Adding cumin,fennel seeds and turmeric

Adding cumin,fennel seeds and turmeric 

Add salt and 2 cups of water. Bring to boil, lower the heat and simmer for 8 minutes 
Adding water
Adding water

add the capsicum cook till cauliflower is cooked. 
Adding capsicum
Adding capsicum

Now add the boiled mung bean stir and cook for 5 minutes. 
Adding boiled mung bean

Add coconut milk and pepper and cook for 3 minutes. Stew is ready.
Adding coconut milk and pepper


Cauliflower stew with mung bean and coconut milk

YOU MAY LIKE TO SEE

Mild Cauliflower stew with black eyed beans in coconut milk
Mild  Cauliflower stew with 
 black eyed beans in coconut milk