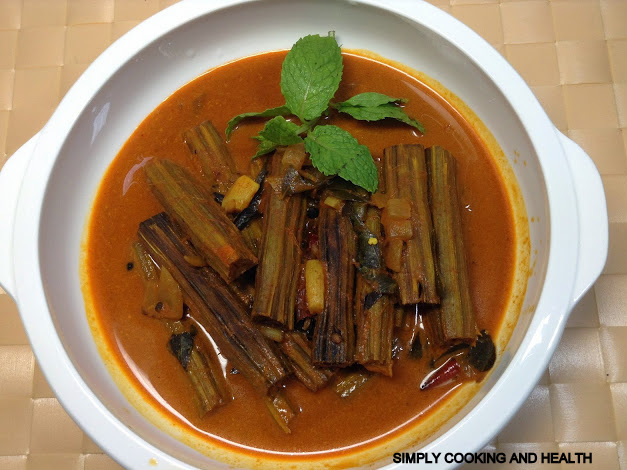
Moringa is a highly nutritious vegetable.
 |
| Juicy and spicy moringa pod gravy |
This is spicy gravy full of flavour from the moringa pods also known as drumsticks.This vegetable takes the name of drumstick because of its shape. If you cannot take hot food leave out the green and red chili and reduce the curry powder to ½ tablespoon. The coconut cream will reduce the heat from the curry powder.
While eating, scoop out the flesh with a spoon. I feel that this is the best curry out of all drumstick curries.
Recipe summary
For
Juicy and spicy moringa pod gravy
Serves: 4
Try this juicy drumstick curry. I think this is the best curry out of all moringa curries. I am sure you will like it.
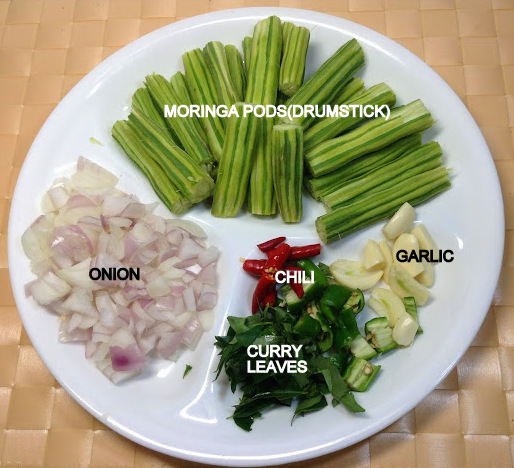
1. Wash and cut the 5 moringa pods into 3” pieces. While slicing, remove the fibre as much as possible. .You can see how to clean moringa in my recipe called Mild Moringa Drumsticks and Raw Plantain Curry.
2. Make a slit about one cm on one sides of each piece.
3.In a medium frying pan or wok add ½ cup vegetable oil and deep fry the sliced moringa pods in batches until they turn golden in color. This took about 10 minutes for each batch of moringa pods. After frying drain the moringa slices in a colander. Reserve the oil as well.
4. In a large saucepan or a frying pan add 2 tablespoon of oil, reserved after frying moringa pods. Heat the oil and when it is hot add ¼ teaspoon mustard seeds and wait till it splutters. Add 1 dry chili fry for 1/2 a minute.
5. Then add 1 onion chopped coarsely, 10 curry leaves chopped, reduce the fire and add ¼ teaspoon cumin seeds, ¼ teaspoon fenugreek seeds, ¼ teaspoon fennel seeds, a few pepper corns and 3 cloves garlic sliced thinly and fry for about 5 minutes, stirring occasionally.
6. Then add green and ½ green chili seeded sliced thinly, 1 red chili seeded and sliced thinly and fry for another 3 minutes.
7. Add 1 table spoon curry powder, 1/8 teaspoon turmeric powder, 1/8 teaspoon pepper powder, ½ teaspoon salt, 3 cups water,and bring to boil
8. Add 20 grams tamarind juice, fried moringa slices and simmer for 15 minutes.
9. Add ½ cup coconut cream and boil for 2 minutes and take off the heat.
I think this is the best curry out pf all moringa curries.
Juicy and spicy moringa pod gravy is ready.
For
Juicy and spicy moringa pod gravy
Preparation time: 30 minutes
Cooking time: 50 minutesServes: 4
Try this juicy drumstick curry. I think this is the best curry out of all moringa curries. I am sure you will like it.
1. Wash and cut the 5 moringa pods into 3” pieces. While slicing, remove the fibre as much as possible. .You can see how to clean moringa in my recipe called Mild Moringa Drumsticks and Raw Plantain Curry.
 |
| Ingredients |
2. Make a slit about one cm on one sides of each piece.
3.In a medium frying pan or wok add ½ cup vegetable oil and deep fry the sliced moringa pods in batches until they turn golden in color. This took about 10 minutes for each batch of moringa pods. After frying drain the moringa slices in a colander. Reserve the oil as well.
4. In a large saucepan or a frying pan add 2 tablespoon of oil, reserved after frying moringa pods. Heat the oil and when it is hot add ¼ teaspoon mustard seeds and wait till it splutters. Add 1 dry chili fry for 1/2 a minute.
5. Then add 1 onion chopped coarsely, 10 curry leaves chopped, reduce the fire and add ¼ teaspoon cumin seeds, ¼ teaspoon fenugreek seeds, ¼ teaspoon fennel seeds, a few pepper corns and 3 cloves garlic sliced thinly and fry for about 5 minutes, stirring occasionally.
6. Then add green and ½ green chili seeded sliced thinly, 1 red chili seeded and sliced thinly and fry for another 3 minutes.
 |
| Juicy and spicy moringa gravy |
7. Add 1 table spoon curry powder, 1/8 teaspoon turmeric powder, 1/8 teaspoon pepper powder, ½ teaspoon salt, 3 cups water,and bring to boil
8. Add 20 grams tamarind juice, fried moringa slices and simmer for 15 minutes.
9. Add ½ cup coconut cream and boil for 2 minutes and take off the heat.
I think this is the best curry out pf all moringa curries.
Juicy and spicy moringa pod gravy is ready.
Recipe follows in detail with pictures.
Preparation time: 30 minutes
Serves: 4
Ingredients
Ingredients
Main5 moringa pods also called drumsticks
Others
1 onion chopped coarsely
10 curry leaves
3 cloves garlic sliced thinly
½ green chili seeded sliced thinly
1 red chili seeded and sliced thinly
½ cup coconut cream
½ teaspoon salt
20 grams tamarind juice
½ cup vegetable oil
3 cups water
Spices
1 red dry chili
¼ teaspoon mustard seeds
¼ teaspoon cumin seeds
¼ teaspoon fennel seeds
¼ teaspoon fenugreek seeds
1 tablespoon curry powder
1/8 teaspoon black pepper powder
1/8 teaspoon turmeric powder
Preparation
.jpg) |
| Moringa pods are being fried in batches |
In a medium frying pan or wok add vegetable oil and deep fry the sliced moringa pods until they turn golden in color. To save the amount of oil I fried them in batches. You may do whatever that is convenient to you. This took about 10 minutes for each batch of moringa pods. After frying drain the moringa slices in a colander. Reserve the oil as well.
 |
| Moringa pods fried to golden colour |
Method
In a large saucepan or a frying pan add 2 tablespoon of oil, reserved after frying moringa pods. Heat the oil and when it is hot add mustard seeds and wait till it splutters. Add dry chili fry for 1/2 a minute. Then add onion, curry leaves, reduce the fire and add cumin seeds, fenugreek seeds, fennel seeds and garlic and fry for about 5 minutes, stirring occasionally..jpg) |
| Spicy ingredients are being fried |
.jpg) |
| After adding water |
.jpg) |
| Add curry powder, turmeric powder and pepper powder. |
.jpg) |
| After adding coconut cream |
.jpg) |
| Moringa pods in final stages of cooking |
Nutrition data for this recipe
Nutrition content is computed by adding nutrition values of individual ingredients according to the USDA nutrition database. Water shown here is what is found in the ingredients and not the water added while cooking. This is only an approximation. For further information please read my post “Nutrition information for my recipes.”
Click the button below to view the nutrition data. Click again to close it.

No comments:
Post a Comment