Saturday, 25 October 2014

Eggplant

Greenish eggplant
Greenish eggplant
Eggplant is also known as aubergine and brinjal. Eggplant is in the nightshade (solanaceae) family which includes other vegetables like potatoes, peppers, tomatoes and tomatillos. Plants in the nightshade family contain an alkaloid called solanine, which in very large doses can be poisonous. Eggplants contain 11mg of solanine. For an average adult, 2 to 5 mg per kilogram of body weight of solanine would be life threatening. Eggplant solanine content varies from 6.1 to 11.33mg/100g. For a person with a weight of 60Kg, 210 mg of solanine would be poisonous. To get this level of poison one should consume about 2.4 kg of eggplant at a time. This is very unlikely. It is only as much poisonous as potato.
Solanine content of potato is normally between 2 and 13 mg/100g.
Cooking process enables breakdown in fibres and leeching out of the solanine.
The flowers and leaves of eggplant are poisonous and should be avoided.
Eggplant is made up of wide range of shape, size and colour. It could be green, bright pink, purple or white in colour.
Purple eggplant
Purple eggplant

The cut surface of the flesh rapidly turns brown when the fruit is cut open. You could simply immerse the cut pieces of the eggplant in cold water to prevent the flesh discolouration. You may also add 1/2 a teaspoon of salt to the water.

Eggplant will absorb a lot of oil during frying. Many recipes recommend salting, rinsing and draining of the sliced fruit (known as "degorging"). Because of its capability to absorb oils and sauces, you can add many flavours to eggplant dishes. It is a very versatile ingredient for many occasions.

Eggplant contains a lot of seeds. The seeds are soft and are edible. For presentation purposes you may want to remove the seeds or buy seedless variety.
Three different varieties of eggplant

Ratatouille is a famous French dish consisting of baked eggplant, zucchini, squash, bell peppers, onion and tomatoes. Eggplant goes well with Parmesan cheese and Eggplant Parmesan is another famous eggplant recipe and an Italian comfort food.

Some people are allergic to eggplant. Some of the symptoms might include slight itching of the mouth, throat or lips. They also may include itching of the skin, flushing of the face and frequent bouts of sneezing etc. The symptoms reported are so wide that some of them could be due to some other causes than eggplant.

In most cases the eggplant allergy is not life threatening. Most people are not allergic to it. However, to be on the safe side you should observe for any allergic feeling after eating eggplant you should seek medical help or avoid it altogether.
Another variety of eggplant

Eggplant skin is full of fiber, potassium, magnesium, calcium and antioxidants. Phenol contained in the eggplant skin makes it a strong free radical scavenger.
Eggplant is ranked among the top 10 vegetables in terms of oxygen radical absorbance capability.
Consumption of eggplant reduces obesity, overall mortality, diabetes and heart disease.
It gives a healthy complexion to the skin and promotes hair growth.
Eggplant lowers cholesterol and cancer risks.
Nasunin, an anthocyanin  found in eggplant skin is a powerful antioxidant which protects membranes in brain cells from free radical damage. Nasunin also has antiangiogenic  properties which will prevent the cancerous cells from increasing their own blood supply.

The nutritional value of egg plant in the USDA database http://ndb.nal.usda.gov/ndb/foods/show/2998

Wednesday, 15 October 2014

Cilantro sauce

Cilanthro sauce
Cilantro sauce
Cilantro is also known as coriander leaves or Chinese parsley. Cilantro has a strong odour. It is used in cosmetic and skin care products. It contains vitamin C, A and K. It contains beta-carotene which is an anti-oxidant. It helps in many detoxification programs. It is a natural preservative and prevents oxidation.
Cilantro has a strong pungent taste. Either you love it or hate it.

Cilantro usually comes in a bundle. Cut off the bunch somewhere in the middle to leave out the roots and hard part of the stem. Some people use only the leaves and leave out the stem altogether.


Since we are going to grind them we can use the softer part of the stem as well. This gives additional flavour.


Cilantro
Cilantro 
   
                                 Recipe summary
                                            For
                                  Cilantro Sauce

Preparation time: 15 minutes

Cooking time: 0
Serves: 4


1. Pluck the upto 3 inches with the stem. Wash with salt water and dry.
Cilantro
Cilantro


2. Add in a food processor or grinder grind the leaves with a table spoon of water.


3. Add 1 onion coarsely chopped, 1 green chilli sliced and 2 cloves garlic and grind.

Ingredients


4. Add 30 grams shredded coconut and grind well.


You can grind into a thick paste or a dilute sauce with water to get your dripping consistency.


Cilanthro sauce
Cilantro sauce


Pour out the contents into a small bowl and add 3 tablespoon yogurt, 1 tablespoon of lime or lemon juice and  and salt and mix well.


Cilantro sauce is ready.
                                  
                                       
                  Recipe follows in detail with pictures.


Preparation time: 15 minutes
Cooking time: 0
Serves: 4

Ingredients
main
150 grams cilantro
Others
1 onion coarsely chopped
1 green chilli sliced
2 cloves garlic
30 grams shredded coconut
1 tablespoon of lime or lemon juice
3 tablespoon yogurt
1 teaspoon of salt


Ingredients for cilantro sauce
Method:
In a food processor or grinder grind the leaves with a table spoon of water.

Cilantro and onion in the grinder

Add onion, green chili and garlic and grind.
Add coconut and grind well.
You can grind into a thick paste or a dilute sauce with water to get your dripping consistency.
Pour out the contents into a small bowl and add yogurt, lime juice   and salt and mix well.
Cilantro sauce after grinding

The sauce is ready. It can be served as a dipping sauce or as an accompaniment to a rice meal. It can also be served with many of the Indian preparations.


Brown rice

Cooked brown rice
Cooked brown rice
See this link for curry leaves sauce recipe..
See this link for egg and potato curry


Brown rice
Brown rice

When rice is hulled by removing only the husk and leaving the bran intact. In the past rice is hulled and polished to make the rice tastier. We can call it unrefined rice. Now the people are more health conscious and brown rice has become popular.                               
                       
Brown rice provided more nutrition while cutting back on the starch content. It takes longer time to cook and a little more rough on the tongue when you eat.

Brown rice is rich in fibre, anti-oxidants, selenium, manganese and naturally-occurring oils. It promotes weight loss. Its slow release of sugar makes it a better food for diabetics. It is considered a perfect baby food.

Brown rice has a shelf life of 6 months.

Germinated brown rice (GBR)  (also known as Hatsuga genmai in Japan) was  developed during the International Year of Rice. The process involves soaking washed brown rice for 20 hours in warm water (34 °C or 93 °F) prior to cooking it. This process stimulates germination, which activates various enzymes in the rice. This rice has a more complete amino acid profile.

Today I am going to cook long grain brown rice in a rice cooker.
    
                                   Recipe summary
                                              For
                                         Brown rice
Preparation time: 1 hour
Cooking time:1 hour

Serves:4


Brown rice
Brown rice

1. Pre-soak 2 cups brown rice in cold water for one hour. Then drain the rice.


Cooked brown rice
2. Add the rice to the rice cooker and 6 cups of water. Switch on the cooker. When the rice is cooked the rice cooker will automatically stop. Switch off the rice cooker so that the keep-warm function will not be activated.

The rice is ready to be served.                                  
                           Recipe follows in detail with pictures.

                
Preparation time: 1 hour
Cooking time:1 hour
Serves:4

Ingredients:
2 cups brown rice
6 cups water

Preparation
Pre-soak the rice in cold water for one hour.Then drain the rice.

Method
Add the rice to the rice cooker and 6 cups of water. Switch on the cooker.
Brown rice in the rice cooker pan

 For normal rice we would have added only 4 cups of water.Here we are increasing the water to 6 cups to let it cook for longer time. When the rice is cooked the rice cooker will automatically stop. Switch off the rice cooker so that the keep-warm function will not be activated.


Cooked rice
Cooked rice

The rice is ready to be served.


Curry leaf sauce to be served with rice

Tuesday, 14 October 2014

Curry leaves sauce


 curry leaves sauce
 curry leaves sauce

Curry leaf is one of the most important ingredients in Indian and south Asian cooking. Often curry leaf is used to flavour the curry, as the name implies. Curry leaf has an extremely mild but delicate flavour that is crucial for the curry.
Curry leaves
Curry leaves

In the ancient times in India, Ayurveda was a way a life. Most of the spices came into Indian cooking after being tried in  Ayurvedic treatment. So curry leaf also has many medicinal properties. It helps in diabetes, anaemia and lowers cholesterol. It protects the liver and stomach. It is also used in post  chemotherapy care.

Today I am going to make a sauce using curry leaf as the main ingredient. This is very easy because there is no cooking involved. This is a raw sauce.


                                      Recipe summary              
                                                 For
                                     Curry leaves sauce

Preparation Time: 15 minutes
Cooking time: 0

Serves: 4


1. Wash 300 grams curry leaves and separate the leaves from the stem. By pulling the stem from top while holding the sprig between two fingers will separate the leaves. Soak and wash the curry leaves with salt water.
Curry leaves
Curry leaves


2. In a food processor or grinder grind the leaves with a table spoon of water.


3. Add 1 onion coarsely chopped, 1 green chilli sliced, 2 cloves garlic, 10 grams ginger and grind.


Ingredients


4. Add 30 grams shredded coconut and 1 tablespoon of lime or lemon juice and grind well.
You can grind into a thick paste or a dilute with water to get your dripping consistency.


 curry leaves sauce
 curry leaves sauce

5. Pour out the contents into a small bowl and add 3 tablespoon yogurt and 1 tsp salt and mix well.

The sauce is ready. 
It can be served as a dipping sauce or as an accompaniment to a rice meal. It can also be served with many of the Indian preparations.

Curry leaves sauce is ready.


                      Recipe follows in detail with pictures.


Preparation Time: 15 minutes
Cooking time: 0
Serves: 4


Ingredients for Curry leaves sauce
Ingredients for Curry leaves sauce
Ingredients:
Main
300 grams curry leaves
Others
1 onion coarsely chopped
1 green chilli sliced
10 grams ginger
2 cloves garlic
30 grams shredded coconut
1 tablespoon of lime or lemon juice
3 tablespoon yogurt
1 teaspoon of salt

Preparation

Wash the curry leaves and separate the leaves from the stem. By pulling the stem from top while holding the sprig between two fingers will separate the leaves. Soak and wash the curry leaves with salt water.
Curry leaves in salt water
Curry leaves in  salt water

Method:
In a food processor or grinder grind the leaves with a table spoon of water.


Curry leaves added for grinding
Curry leaves added 
for grinding

Curry leaves after grinding


Add onion, chili, garlic and ginger and grind.

Other ingredients to be ground with curry leaves

Add coconut and lime juice and grind well.

Finally coconut is added

You can grind into a thick paste or a dilute with water to get your dripping consistency.
Pour out the contents into a small bowl and add yogurt and salt and mix well.
Final curry leaves sauce


The sauce is ready. It can be served as a dipping sauce or as an accompaniment to a rice meal. It can also be served with many of the Indian preparations.

Sunday, 12 October 2014

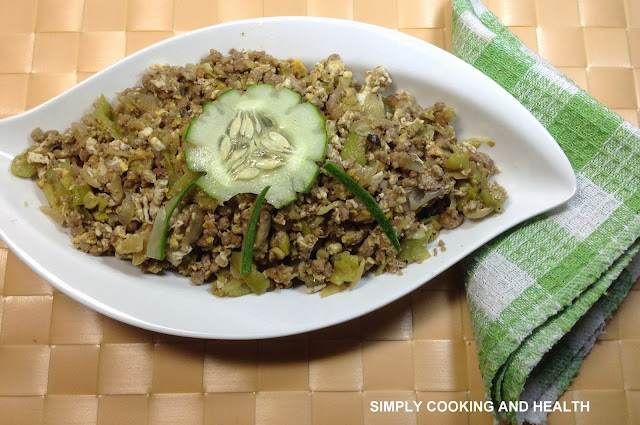
Luffa stir-fry with minced beef

Luffa stir-fry with minced beef


Luffa is an uncommon vegetable. It is seasonal and you will get once a year during the season. When in season, I like to use it as much as possible.

Introduction to this vegetable in given in my post ………………

Today I want to make a luffa stir-fry with minced beef.


                                    Recipe summary
                                              For  
                         Luffa stir-fry with minced beef

Preparation Time:20 minutes
Cooking Time: 45 minutes

Serves: 4

1. Peel and slice 300 grams luffa into ¾ inch slices.


Cleaning luffa
Cleaning luffa

2. Add 150 grams minced beef to a small saucepan add 1 cup of water, 3 cloves garlic sliced thinly, 5 gram piece of ginger diced finely, ½ teaspoon black pepper powder, 1/4 teaspoon turmeric powder and ½ teaspoon of salt. Bring it to the boil and reduce the heat and simmer covered for 30 minutes. Please check water level in between. Once the beef is cooked keep aside.
Cooked mined beef
Cooked mined beef
3. In a large sauce pan add 2 table spoon of oil and heat it. When the oil is hot add 2 onions chopped finely and 1 leeks chopped finely and fry in low heat for about 10 minutes. 
Ingredients
4. Add luffa slices and fry for another 7 minutes. 


5. Add 1/2 cup of water and the cooked beef. Bring to the boil.

6. Break 2 eggs into the saucepan. Continue to cook till most of the water has evaporated and the egg is hardened. Add salt and pepper and taste for seasoning and adjust.
Luffa stir-fry with minced beef
   Luffa stir-fry with minced beef

The stir-fry is ready. It can be served as a main meal or served with rice or bread.

Note: While eating I noticed that the beef overshadowed the dish. I would suggest reducing the beef to 100 grams or even less at 75 grams.


Luffa stir-fry with minced beef is ready.
                                  

Recipe follows in detail with pictures.    


Preparation Time:20 minutes
Cooking Time: 45 minutes
Serves: 4

Ingredients
Main
300 grams luffa
150 grams minced beef
1 Leek sliced into thin slices
Others
2 onions coarsely chopped
2 egg
5 gram piece of ginger diced finely
3 cloves garlic sliced thinly
½ teaspoon black pepper powder
½ tablespoon salt
1/4 teaspoon turmeric powder.
2 tbsp oil
1½ cup water


Ingredients for Luffa stir-fry with minced beef
Ingredients for Luffa stir-fry with minced beef


Preparation
Peel and slice luffa into ¾ inch slices.


Cleaning luffa
Cleaning luffa


Add minced beef to a small saucepan add 1 cup of water, garlic, ginger,pepper, turmeric  and ½  teaspoon of salt. Bring it to the boil and reduce the heat and simmer covered for 30 minutes. 
Minced beef is boiled separately

By this time almost all the water would have evaporated.Please check water level in between. If the beef gets dry before it is cooked to your satisfaction and required softness, add a couple of spoons of water. When the beef is cooked remove from heat and set it aside.
Cooked mined beef
Cooked mined beef

Adding ginger garlic paste and pepper  will make the beef softer and will speed up the cooking time. Turmeric becomes the disinfectant and protects the meat curry from bacteria.
Eggs are added
                                        Eggs are added

In a large sauce pan add 2 table spoon of oil and heat it. When the oil is hot add onion and leeks and fry in low heat for about 10 minutes. Add Luffa slices and fry for another 7 minutes.
                                                             
Add 1/2 cup of water and the cooked beef. Bring to the boil. Break 2 eggs into the saucepan. Continue to cook till most of the water has evaporated and the egg is hardened. Add salt and pepper and taste for seasoning and adjust.
Now the stir-fry is ready.
The stir-fry is ready. It can be served as a main meal or served with rice or bread.

Note: While eating I noticed that the beef overshadowed the dish. I would suggest reducing the beef to 100 grams or even less at 75 grams.

Sunday, 5 October 2014

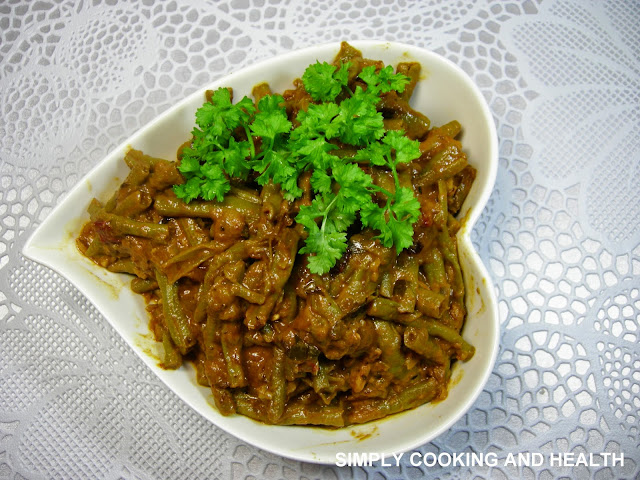
Spicy long bean curry

Spicy long bean curry


Long beans are available throughout the year. They are also known as yard long beans because of their length. Although they care called yard long they are seldom longer than half a yard.
Long beans are low in fat and sodium. They contain protein, vitamin A, thiamin, riboflavin, iron, phosphorus, and potassium. They also provide vitamin C, folate, magnesium, and manganese.
Nutrition information of this beans in found here on USDA database.
Long beans aka yard long beans


For cooking young and tender beans are preferred to mature beans. Mature beans can be used in soups and stews. You can also make tasty pickles out of them.
Sliced beans
Sliced beans

Always choose fresh and flexible beans that are very bright green in colour, when shopping for beans. You can store them in a plastic bag in the refrigerator for up to 5 days.

In Chinese cuisine these beans are usually stir-fried with minced pork. Beans are cooked lightly so that the beans will retain the deep green colour and the beans will be crispy. The beans will have the raw taste. Alternatively beans will be added to pork or other meat dishes.

Today I am going to prepare a curry where the beans are slightly over-cooked to be very tender and soft. This gives a very delicious taste. This can be done in two ways. One way is to deep or shallow fry the beans before adding to the curry.  The other method is to simmer it for a longer time to let them be very tender.

I am giving two versions of this curry. One is mild and the other is mild. Cooking method and the ingredients spicy  and mild are almost the same but in the mild curry I am not using any oil for frying. Both are great in their own ways.


            Recipe summary             
                                                  For 
                                     Spicy long bean curry

Preparation time: 40 minutes
Cooking time: 1 hr
Serves: 6


1. Wash and remove the fiber found at each side of  the 700 grams long beans by pulling from the ends. (See picture below)
Now slice the beans into 1 ½ inch long pieces or break the beans with your fingers into 1½ inch pieces.
Long beans aka yard long beans
Long beans aka
 yard long beans

2. In a medium sized frying pan or a wok heat 2 tablespoon vegetable oil.

3. Reduce the heat and add 1 dry red chilli broken into small pieces and fry for ½ minute. 

4.Add ½ teaspoon cumin seeds, ½ teaspoon fennel seeds, ½ teaspoon fenugreek seeds and fry for another ½ minute. 

You will have to remove the fiber jutting out by pulling it
You will have to remove the 
fiber jutting out by pulling it

5. Add 1 onion sliced coarsely, 1 green chilli cut into small pieces, ½ teaspoon ginger paste and 3 cloves garlic sliced,1 sprig curry leaves chopped. Fry for another 8 minutes.

6. Add 1 tablespoon curry powder, ½ teaspoon turmeric powder and fry for another ½ minute.

Ingredients

7. Add three cups of water and bean slices. Bring to the boil. Normally you cook this as a dry curry. But if you want some gravy you can add more water.
Simmer covered for 30 minutes, stirring occasionally,  in medium heat or until the beans turn into a dull green colour and the beans are very soft.
Spicy long bean curry
 Spicy long bean curry

8. Add 10 grams tamarind juice (1 tablespoon), 1 teaspoon salt, ½ teaspoon pepper powder and ½ teaspoon garam masala powder and cook for 10 minutes, covered.

9. Add ½ cup coconut cream and cook for about 2 minutes. Remove the cover and cook for another one minute.

Taste for seasoning.

Spicy long bean curry is ready.


                     Recipe follows in detail with pictures.


Spicy long bean curry

This is the spicy version of the long bean curry. This can be served with rice at a party.

Preparation time: 40 minutes
Cooking time: 1 hr
Serves: 6


Ingredients for Spicy  long bean curry
Ingredients for Spicy  long bean curry
Ingredients
main
700 grams long beans
Others
1 onion sliced coarsely
3 cloves garlic sliced thin
½ teaspoon grated ginger
1 green chilli cut into small pieces
1 sprig curry leaves chopped
10 grams tamarind juice (1 tablespoon)
½ cup coconut milk
1 teaspoon salt
2 cups water
2 tablespoon vegetable oil of your choice
Spices
½ teaspoon cumin seeds
½ teaspoon fenugreek seeds
½ teaspoon pepper powder
½ teaspoon fennel seeds
½ teaspoon turmeric powder
½ teaspoon garam masala powder
1 dry red chilli broken into small pieces
1 tablespoon curry powder


Ingredients are frying in a wok

Preparation
Tender beans will break easily when you pull them with your fingers. If they are not tender there will be a strong fibber at each side of the bean. You will have to pry the end of the bean with a knife or use your index finger and thumb together and pull out the fibre as shown in the picture.
You will have to remove the fiber jutting out by pulling it
You will have to remove the fiber jutting out by pulling it

Now slice the beans into 1 ½ inch long pieces. If the beans are tender there will be no fibre at the sides and you can just break the beans with your fingers into 1½ inch pieces.

Method
Sliced bean added to the ingredients
Sliced  bean added to the ingredients

In a medium sized frying pan or a wok heat the oil.
Reduce the heat and add dry chili and fry for ½ minute. Add cumin seeds, fennel seeds, fenugreek seeds and fry for another ½ minute. Add onion, green chili, ginger garlic paste and curry leaves. Fry for another 8 minutes.
Add curry powder, turmeric powder and fry for another ½ minute.
Add three  cups of water and bean slices. Bring to the boil. Normally you cook this as a dry curry. But if you want some gravy you can add more water.
Beans are fryimg
Beans are frying
Simmer covered for 30 minutes, stirring occasionally,  in medium heat or until the beans turn into a dull green colour and the beans are very soft.
Most of the water would have evaporated by now but the curry will still retain some moisture. If it is too dry add little water.
Beans are not yet cooked enough
Add tamarind juice, salt, pepper powder and garam masala powder and cook for 10 minutes, covered.
Add coconut cream and cook for about 2 minutes. Remove the cover and cook for another one minute.
Taste for seasoning.
Coconut cream added
Coconut cream added
Curry is ready Cooking time is more because we allow the beans to cook well  in slow fire to turn into a mushy long beans curry. That is the secret of this curry. If you don't want it to be mushy you can stop when the beans are cooked and milk is added.  But don't forget to try this mushy curry at least once.  You will see a difference. Enjoy.

Spicy long bean curry in final stage
Spicy long bean  curry in final stage